SInject
SInject is a dependency injection framework for unity. It is designed to be straightforward to use. It is based on the concept of injectors and services. It is designed to be used in a way that is fast to understand and use. It also includes a testing framework that makes it easy to write tests for your code. Make sure to check out the samples to see how to use it.
com.overefactor.sinject Install via UPM
Add to Unity Package Manager using this URL
https://www.pkglnk.dev/sinject.git README Markdown
Copy this to your project's README.md
## Installation
Add **SInject** to your Unity project via Package Manager:
1. Open **Window > Package Manager**
2. Click **+** > **Add package from git URL**
3. Enter:
```
https://www.pkglnk.dev/sinject.git
```
[](https://www.pkglnk.dev/pkg/sinject)README
![]()
![]()
SInject
SInject is a dependency injection framework for unity. It is designed to be straightforward to use. It is based on the concept of injectors and services. It is designed to be used in a way that is fast to understand and use. It also includes a testing framework that makes it easy to write tests for your code. Make sure to check out the samples to see how to use it.
Installation
You can install SInject via Unity Package Manager. You will find it under My Assets section in Unity Package Manager.
If you are using custom assembly definition files, you will need to add Sapo.DI.Runtime assembly
reference to your assembly definition file. If you are not using assembly definition files, you are all set.
Features
- ✓ Simple and easy to use
- ✓ Supports DI for scenes and prefabs
- ✓ Allows for persistent objects across scenes
- ✓ Supports Components injection
- ✓ Supports Scriptable Objects
- ✓ Supports .net objects
- ✓ Supports circular dependencies
- ✓ Includes testing helpers
- ✓ Support collections
How to use
Setup root injector
To use SInject, we need to create a root injector.
This is the main injector that will be used to inject dependencies into our objects.
In our first scene, right-click in the hierarchy and select DI/Root Injector.
If you don't see the
DI/Root Injectoroption, it means that root injector is already set up in the scene.
Now we will see in inspector a Root Injector component.
Root injector is a singleton, so we can only have one in scene or one across scenes.
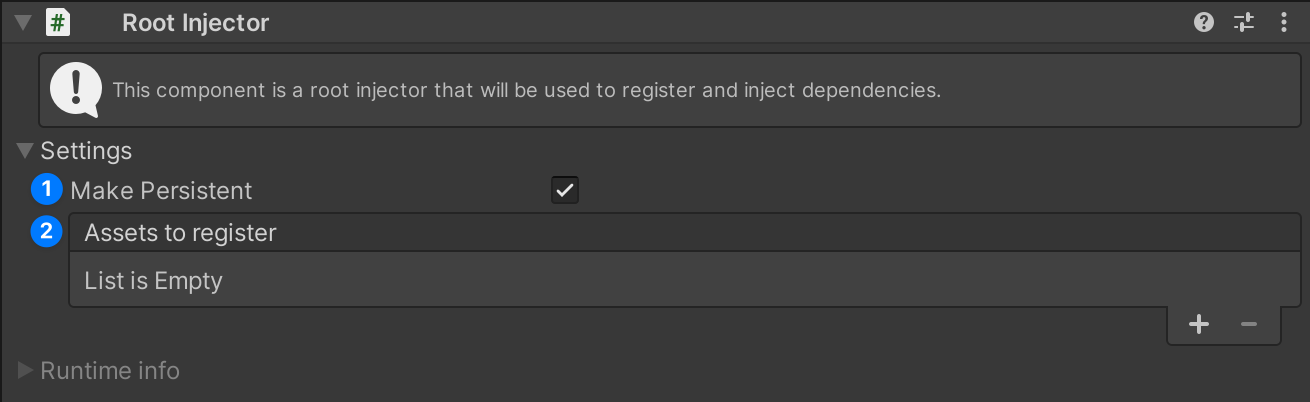
As you can see, there are two sections (Settings and Runtime info), for now we will focus on the settings section.
There are two options:
Make Persistent- If this is checked, the root injector will not be destroyed when loading a new scene.Assets to register- Here we can drag and drop scriptable objects that we want to register in the injector. Most of the time this will be your singleton services, their lifetime will be the same as the root injector's. Please note that you can only drag and drop scriptable objects that are defined withSRegisterattribute.
Now after we have created the root injector, we also need to create SceneInject to mark this scene to be injected when loaded.
Right-click in the hierarchy and select DI/Scene Inject.
If you don't see the
DI/Scene Injectoption, it means that scene inject is already set up in the scene.
Scene Inject is a component that injects an entire scene when a scene is being loaded. Please note that after a scene is loaded,
gameObject on which Scene Inject is attached will be destroyed.
Setup a scriptable object service
To inject a scriptable object, we need to define it with SRegister attribute.
using Sapo.DI.Runtime.Attributes;

[CreateAssetMenu(menuName = "ServiceA")]
[SRegister(typeof(IServiceA))] // This is the interface that we want to inject, we can also use the concrete class
public class ServiceA : ScriptableObject, IServiceA
{
    public void Introduce()
    {
        Debug.Log("Hello, I am ServiceA!");
    }
}
Now in unity, create this scriptable object and drag it to the Assets to register field in the root injector.

Set up a Component service
To inject a component, we need to define it with SRegister attribute.
using Sapo.DI.Runtime.Attributes;

[SRegister(typeof(IServiceB))] // This is the interface that we want to inject, we can also use the concrete class
public class ServiceB : MonoBehaviour, IServiceB
{
    public void Introduce()
    {
        Debug.Log("Hello, I am ServiceB!");
    }
}
Injecting dependencies
With the setup of our root injector and the registration of our scriptable object services, we are now equipped to inject our dependencies into various components or other scriptable objects. This allows us to use the power of dependency injection, promoting loose coupling and enhancing the modularity and testability of our code.
We can now inject dependencies into components or other scriptable objects.
using Sapo.DI.Runtime.Attributes;

public class Player : MonoBehaviour
{
    [SInject] private IServiceA _serviceA;
    [SInject] private IServiceB _serviceB;

    private void Awake()
    {
        _serviceA.Introduce();
        _serviceB.Introduce();
    }
}
In this point, we can create a prefab with Player script attached to it and when we run the game, we will see in the console:
Hello, I am ServiceA!
Hello, I am ServiceB!
Injecting components
SInject also includes similar attribute CInject for injecting components that are attached to the same gameObject.
using Sapo.DI.Runtime.Attributes;

public class Player : MonoBehaviour
{
    [CInject] private IServiceB _serviceB;

    private void Awake()
    {
        _serviceB.Introduce();
    }
}
This will inject ServiceB component that is attached to the same gameObject as Player component.
And the service does not need to be registered in DI
This will only work if
Scene Injectis in the scene orGameObject Injectis on the player gameObject.
Spawning prefabs with dependencies
When we want to spawn a prefab and execute injection on it, we need to add GameObject Inject on a root object of prefab.
This component will schedule injection on this gameObject and all its children. After injection is done, GameObject Inject
will be destroyed. To add GameObject Inject to prefab, click on Add Component and search for GameObject Inject or
select Sapo/DI/GameObject Inject in a context menu.
In GameObject Inject component, we can also see a Local Injector toggle. If this is checked, GameObject Inject will
create a new injector that will be used only for this gameObject. This is useful when we want to have services that are only
available to specific gameObject. We can register to Local Injector both component services and scriptable object services as well.

Custom Injection
If you want to register or inject dependencies in an own way, you can implement
ISInjectorRegisterHandler and ISInjectorInjectHandler interfaces.
using Sapo.DI.Runtime.Attributes;
using Sapo.DI.Runtime.Interfaces;

public class Service : MonoBehaviour, IService, ISInjectorRegisterHandler, ISInjectorInjectHandler
{
    [SInject] private ISInjector _injector;

    void ISInjectorRegisterHandler.OnRegister(ISInjector injector)
    {
        injector.Register<IService>(this);
    }

    void ISInjectorInjectHandler.OnInject(ISInjector injector)
    {
        // _injector is null
        injector.Inject(this);
        // _injector is injector
    }

    private void OnDestroy()
    {
        _injector.Unregister<IService>(this);
    }
}
Collection Injection
SInject supports collection injection, allowing you to register multiple instances of the same type. When resolving a
single instance using Resolve
For collection injection, SInject supports three collection types:
T[]List<T>IEnumerable<T>
When resolving a collection, SInject guarantees that the collection will contain all currently registered instances at the time of resolution. However, the order of instances in the collection is not guaranteed. When resolving a collection with no registered instances, an empty collection will always be returned.
using Sapo.DI.Runtime.Attributes;
using Sapo.DI.Runtime.Interfaces;

public class Consumer : MonoBehaviour
{
    [SInject] private IService[] _services;
    [SInject] private ISInjector _injector;

    private void Awake()
    {
        foreach (var item in _injector.Resolve<IEnumerable<IItem>>())
        {

        }
    }
}
Advanced Injection
SInject provides additional ways to resolve dependencies at runtime. You can resolve types directly through the injector interface:
- Resolve single instance with
Resolve<T>() - Try to resolve with
TryResolve<T>(out T instance) - Resolve all instances of a type with collections:
T[],IEnumerable<T>,List<T> - Resolve instances manually with
ISInjectorinterface
Here's an example of using different resolution methods:
using Sapo.DI.Runtime.Attributes;
using Sapo.DI.Runtime.Interfaces;

public class Consumer : MonoBehaviour
{
    [SInject] private ISInjector _injector;
    private IService _service;

    private void Awake()
    {
        // if following statement is callend in ISInjectorInjectHandler.OnInject it is equivalent to adding [SInject] to _service field.
        _service = _injector.Resolve<IService>();
    }
}
Custom Editor GUI for Registered Services
If you create a custom Unity editor for a Unity component or ScriptableObject that is defined with the SRegister attribute,
you can manually call SRegisterGUI.DrawInfo(target) to draw information about the service.
This allows you to customize the way the service information is displayed in the Unity editor.
Here's how it looks when no custom editor is used:

Here's an example of how you can use SRegisterGUI.DrawInfo(target) in your custom editor:
using UnityEditor;
using UnityEngine;

[CustomEditor(typeof(MyComponent))]
public class MyComponentEditor : UnityEditor.Editor
{
    public override void OnInspectorGUI()
    {
        SRegisterGUI.DrawInfo(target);
        DrawDefaultInspector();
    }
}
This will draw the service information at the top of the inspector for MyComponent, followed by the default inspector.
Please note that if you are using custom assembly definition files, you will need to add
Sapo.DI.Editorassembly
Testing
SInject includes a testing framework to help you write unit tests for your game code. While testing games can be challenging, having proper testing tools is essential for maintaining code quality and reliability. The main benefit of using SInject is that it promotes writing more code-driven solutions rather than relying solely on dragging objects in the Unity editor, which improves testability.
Here is a self-explanatory example of how to test a component that uses dependency injection.
 [TestFixture]
 public class PlayerTests
 {
     private STestGameObjectHelper _gHelper;

     [SetUp]
     public void SetUp()
     {
         _gHelper = new STestGameObjectHelper();
     }

     [TearDown]
     public void TearDown()
     {
         _gHelper.Dispose();
     }

     [Test]
     public void TakeDamage_With10Damage_ShouldReduceHealthBy10()
     {
         // Arrange
         var playerG = _gHelper.CreateG<Player>();
         var player = playerG.GetComponent<Player>();
         var injector = new STestGamObjectInjector(playerG);

         // Mocking the health component
         var health = new Mock<IHealth>();
         health.SetupGet(h => h.Value).Returns(100);
         health.SetupSet(h => h.Value = It.IsAny<int>()).Verifiable();

         // Injecting the health component
         injector.Register<IHealth>(health.Object);

         // Finally activating player game object
         injector.Activate();

         // Act
         player.TakeDamage(10);

         // Assert
         health.VerifySet(h => h.Value = 90, Times.Once);
     }
 }
Please note that if you want to use test injector helpers, you will need to add
Sapo.DI.Runtime.Testsassembly reference to your test assembly definition file. For more information about testing, you can checkTestingsample.
Samples
You can install samples via Unity Package Manager. Go to Window/Package Manager, select In Project tab and search for SInject.
You will see Samples section where you can install samples.
SInjector
The SInjector class is the main dependency injection container that implements ISInjector. This section demonstrates
how to use it as a standalone injector.
Self-Registration
- Each
SInjectorinstance automatically registers itself asISInjector - It does not register itself as concrete type
SInjector - Can be resolved using
Resolve<ISInjector>()
Registration
- Register instances using
Register<T>(instance)where T is the type to register as - Multiple instances of the same type can be registered
- Attempting to register a duplicate instance will log an error
- An instance can be registered under multiple types (e.g., both interface and concrete types)
Resolution
Resolve<T>()returns the primary (first registered) instance of type TResolve<T[]>()returns all registered instances of type T- Returns
nullif no instances are registered for the requested type
Hierarchical Injection
When creating a child injector with new SInjector(parentInjector):
- Child injector maintains its own registrations
- Child injector can access parent's registrations
- Child injector registers itself as
ISInjector - Resolution order:
- Searches child injector first
- Falls back to the parent injector if not found
- Array resolution (
Resolve<T[]>()) returns unique instances from both child and parent injectors
Unregistration
- Use
Unregister<T>(instance)to remove a registration - Affects only the injector where the instance was registered
- After unregistration:
- The next registered instance becomes primary
- Instance is removed from array resolution results
A behavior-based example:
using NUnit.Framework;
using Sapo.DI.Runtime.Core; // SInjector is in Core
using Sapo.DI.Runtime.Interfaces;

// This is called in RootInjector
var rootInjector = new SInjector();


// injector registers self as ISInjector
Assert.That(rootInjector.Resolve<ISInjector>(), Is.EqualTo(rootInjector));
// ... however not as SInjector
Assert.That(rootInjector.Resolve<SInjector>(), Is.Null);

// Imagine we have class Service and interface IService

var service1 = new Service();
var service2 = new Service();

// this will register serviceN as IService
rootInjector.Register<IService>(service1);
rootInjector.Register<IService>(service2);

// doing this will log error to Debug
rootInjector.Register<IService>(service2);


// service1 is primary service when resolving `IService`
Assert.That(rootInjector.Resolve<IService>(), Is.EqualTo(service1));

// resolving `IService[]` will contain 2 elements service1 and service 2
Assert.That(rootInjector.Resolve<IService[]>(), Is.EquivalentTo(new [] { service1, service2 }));

// registering service2 as Service
rootInjector.Register<Service>(service2);
// when resolving `Service` will cause resolving service2
Assert.That(rootInjector.Resolve<Service>(), Is.EqualTo(service2));

// This is called in GameObjectInject
var injector = new SInjector(rootInjector);

// injector registers self as ISInjector
Assert.That(injector.Resolve<ISInjector>(), Is.EqualTo(injector));
// rootInjector is still registered
Assert.That(injector.Resolve<ISInjector[]>(), Contains.Item(rootInjector));

// so now primary instances are gathered firstly from `injector`

// service1 is still primary
Assert.That(injector.Resolve<IService>(), Is.EqualTo(service1));

// after doing this the service is registered in `injector`
injector.Register<IService>(service2);

// service2 is now primary
Assert.That(injector.Resolve<IService>(), Is.EqualTo(service1));
// `rootInjector` is untouched
Assert.That(rootInjector.Resolve<IService>(), Is.EqualTo(service1));

// when resolving the collection of services, will contain only unique services
Assert.That(injector.Resolve<IService[]>(), Is.EquivalentTo(new [] { service1, service2 }));

// Register service1 as IService
rootInjector.Unregister<IService>(service1);

// this will affect make service2 primary (as IService) in `rootInjector`
Assert.That(rootInjector.Resolve<IService>(), Is.EqualTo(service2));

// when resolving the collection of services, now will contain only 1 service
Assert.That(rootInjector.Resolve<IService[]>(), Is.EquivalentTo(new [] { service2 }));
Assert.That(injector.Resolve<IService[]>(), Is.EquivalentTo(new [] { service2 }));
SInject Context Debugger
SInject includes a Context Debugger window that allows you to inspect and debug your dependency injection containers at runtime. You can see what services are registered and their status in different injector scopes (root injector and local injectors).
Opening the Debugger
To open the Context Debugger window in Unity Editor:
- Go to
Window/Sapo/DI/Context Debugger - Select a game object in the hierarchy to see its injection context
- Use the navigation at the top to switch between different injector scopes
- Inspect registered services and their status in the selected injector scope

Injection Pipeline
Please keep in mind that this framework is heavily using reflection to register and inject dependencies. Also, this framework can have performance peeks when loading huge scenes.
When a scene is loaded or a prefab is spawned, the injection pipeline is executed.

The initialization phase, which is responsible for registering service assets, is executed only once on the root injector.
License
This project is licensed under the MIT License.
Note: While the license permits commercial use, please do not repackage or resell this package as-is.
Commercial use within larger software solutions is welcome and encouraged.
Comments
No comments yet. Be the first!
Sign in to join the conversation
Sign In